DIY by Kelly Johantges | Photography by Bea Amsalu | Art by Bryce Forren
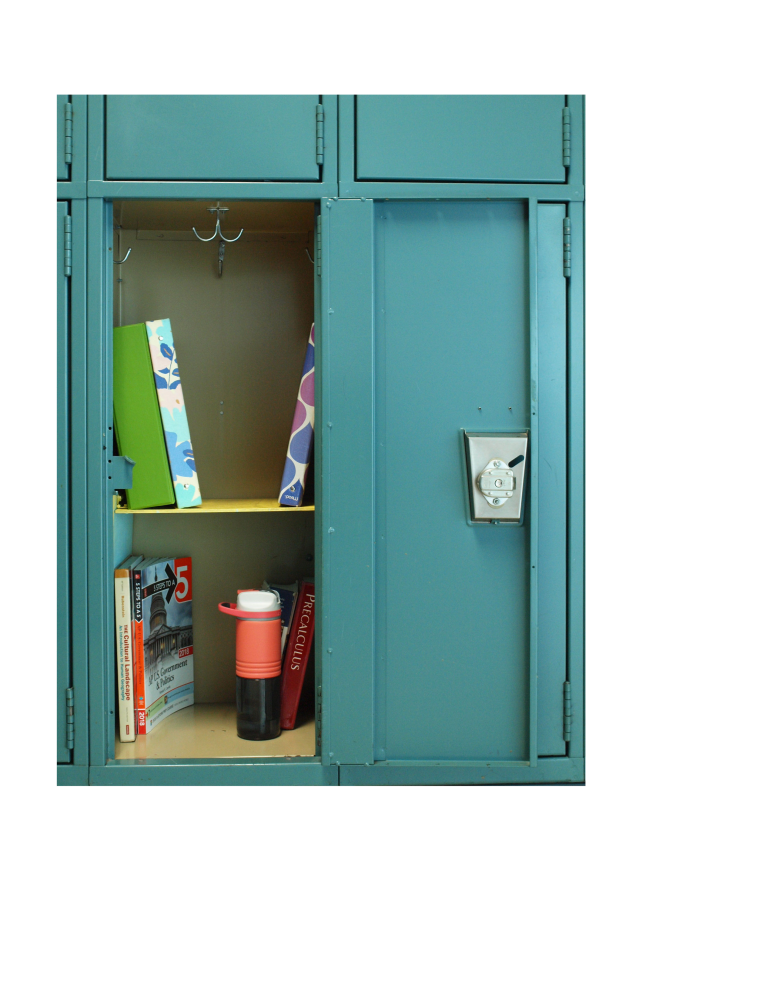
Lockers at East are great, but the lack of shelves makes it hard to keep books organized. Here is how to make a locker shelf customized for East lockers.
What You Will Need :
- Two ¼ inch plywood cut 2ft by 2ft
- $3.98 each, Birch Veneer
- Four 2-inch Narrow Hinges
- Pack of 2 for $2.48 each
- 48 No. 8 Flat Washers
- Pack of 36 for $1.28
- 16No. 8 (½ inch) Screws
- Pack of 10 for 1.28
- Wood Glue
- $3.98
- Paint (optional) $5.28
- Pencil/Writing Utensil
- Power Drill (3/16 inch drill bit)
*prices from Lowes
Step 1) Measure and cut two 16-inch tall by 11 ½ inch wide pieces of plywood for the sides of the shelf. Next, cut one 13 ½ inch wide by 11 ½ inch deep piece for the top and two 4-inch by 15 ½ inch pieces to support the sides of the shelf. Lastly, cut one four inch by 13 inch section of wood to support the top.
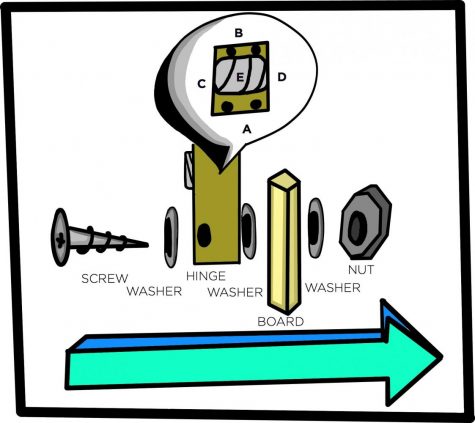
Step 2) Take one of the side pieces and one of the hinges. Orient the hinge so that the edge side A [image 1] is two inches away from the top and part of the wood, side B is above it and side E is facing up. The edge of side C of the hinge should be three-and-a-half inches away from the left edge of the board. Once the hinge is placed there, take a writing utensil and trace the circles from the hinge onto the board. Then repeat the same process except make the edge of side D of the hinge three and a half inches away from the right side of the board. Now that you have started to mark the board, write the number one on the side you made your circles so you know what piece you are assembling. Set this piece aside for now.
Step 3) The next step is to take the other side board and a hinge, then line up the edge side B with the top edge of the board with side A below it and side E facing down. The edge of side D should be three and a half inches away from the board’s left edge. Again, trace the holes and repeat on the right side of the board except the edge of side C should be three and a half inches away from the edge. Write the number two on this side. Set this piece aside for now.
Step 4) Take the top piece and orient it so that the short side is at the top. Write the number three at the top. Flip the board over so number one is facing your workspace and write a number four at the top of this side. Flip the board back over to side number three.
Step 5) On the left side of the board take side B of the hinge and line it up with the top so that side A is hanging off the top side and side E is facing up. The edge of side C should be three and a half inches from the left edge of the board. Trace the holes of the hinge. Repeat this step on the right side of the board except the edge of side D should be three and a half inches from the right side of the board.
Step 6) Flip the board over to side number four and repeat step five.
Step 7) Take a power drill, and cut out all the holes you made when tracing the hinges.
Step 8) Take the side support pieces and use the wood glue to place them in a vertical line in the center of both side pieces A and B; they should be in between the sets of holes you made in the previous step. Take the top support piece and glue it to the top piece on side three in between the sets of holes for the hinges.
Step 9) Next, it’s time to assemble the shelf. Start with side piece one and have it faced so the number is facing the inside and the holes are at the top. Line up the hinge with the holes on the side piece. Then fill the aligned holes with the screws. All the screws have the same order on how they should be placed; screw, washer, board, washer, hinge, washer, nut [image 1]. Now move on to side piece two and make sure the number is facing the inside. Line up the top part of the hinge with the holes on the wood. Then, like before, put the screws in using the screw pattern.
Step 10) Moving on to the top piece. Take side one and have the number facing up. Take side B of the hinge that is already connected to side one which is already connected to part one and line it up with the holes on side three of the top piece [the number three should be facing down]. Place the screws in using the pattern. Connect the hinge on the right side of side one to the holes on side three, placing the screws in the usual pattern.
Step 11) Next pick up side two and line up the hinges with the holes on side four. The hinges should be on top of the board. Connect the hinges using the the pattern.
Step 12) At this point all the holes should be filled. Take a wrench and tighten all the nuts on the ends of the screws for a tight hold. To add design, use your paint to decorate it as you like.
